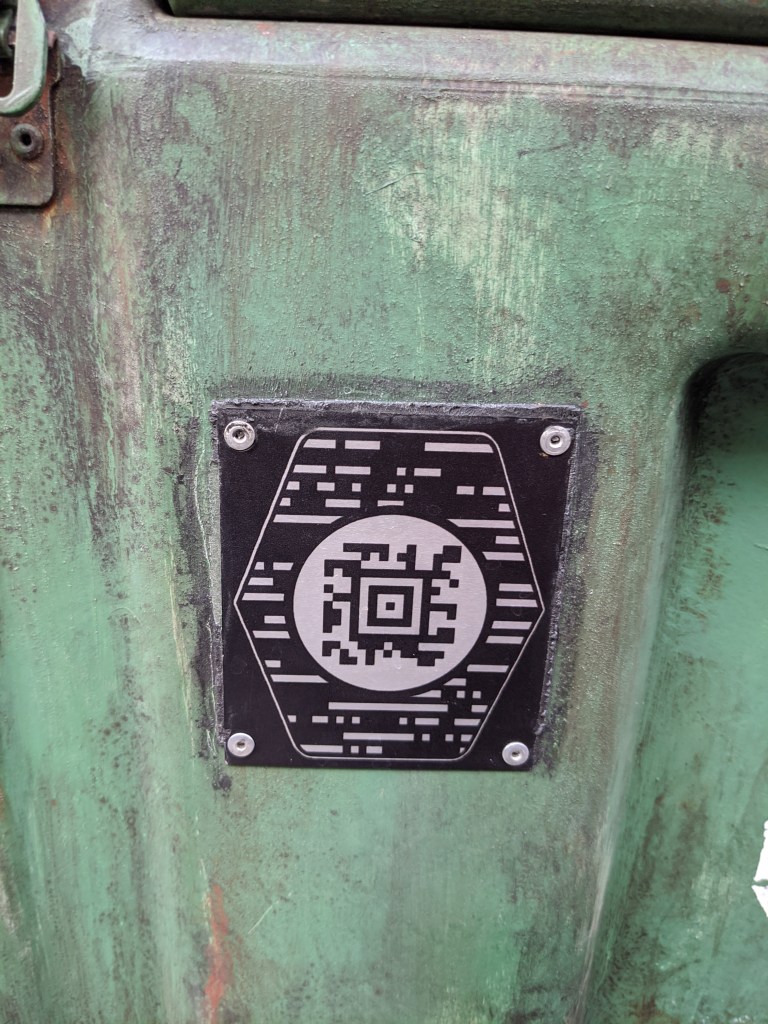
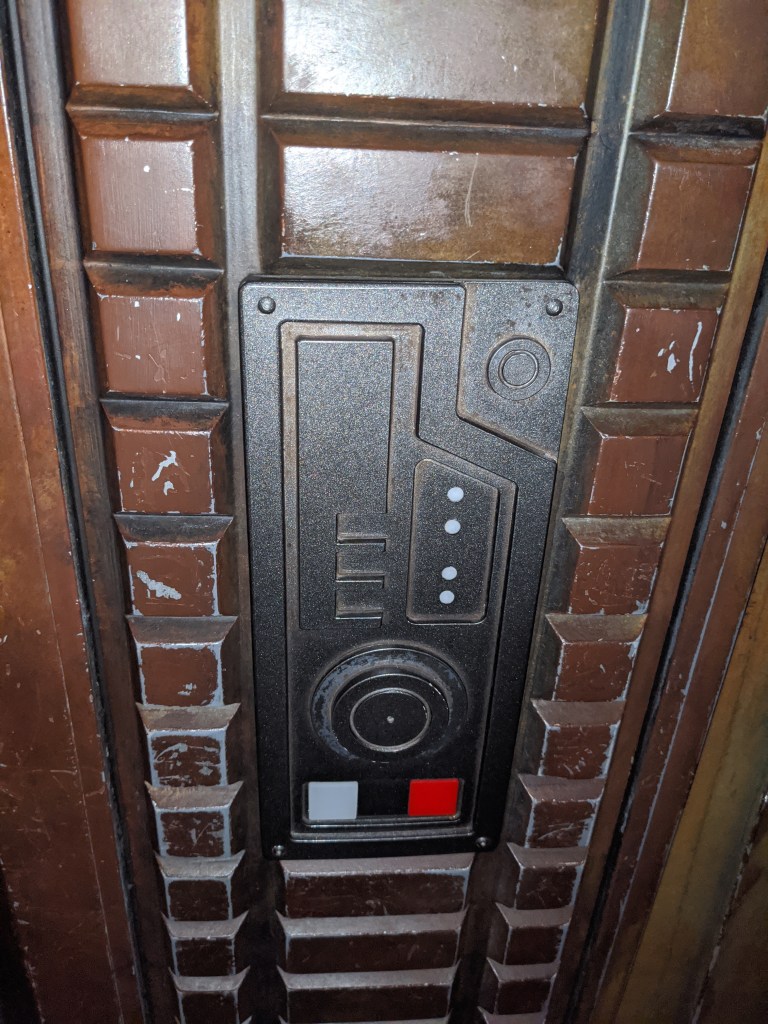
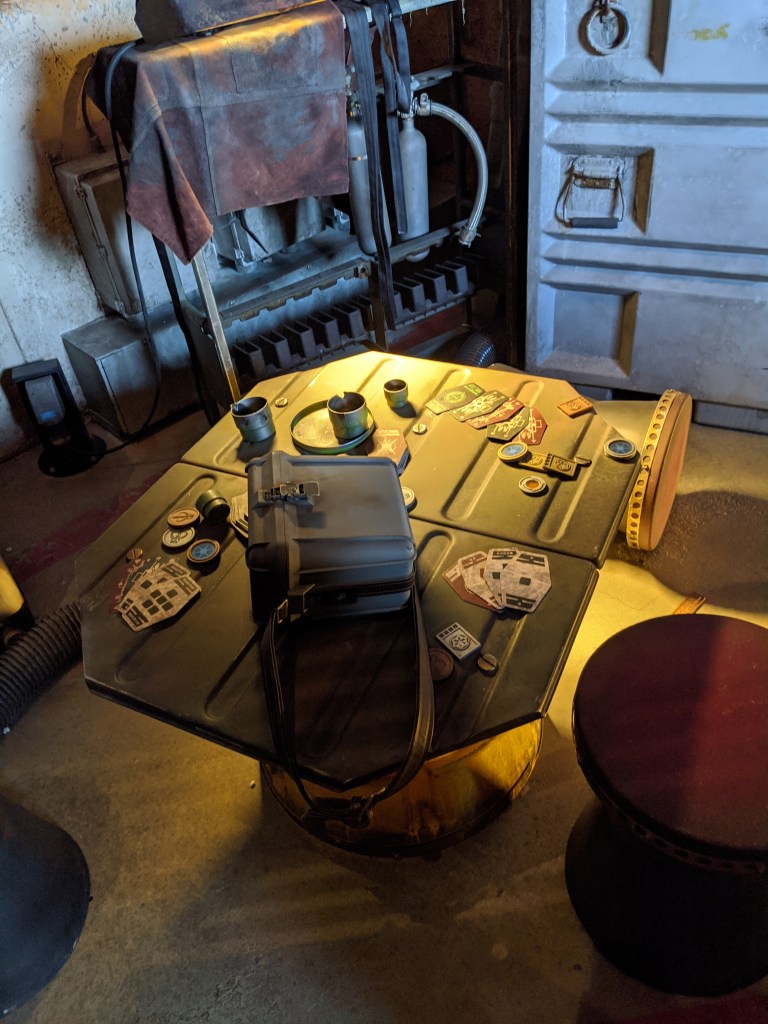
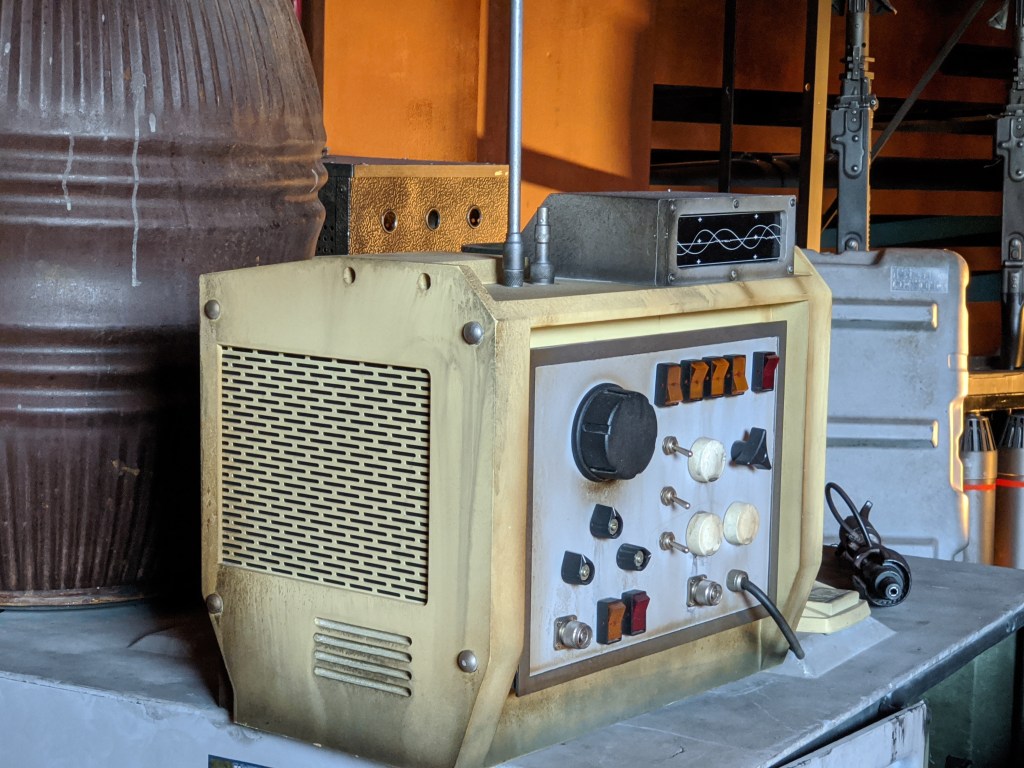
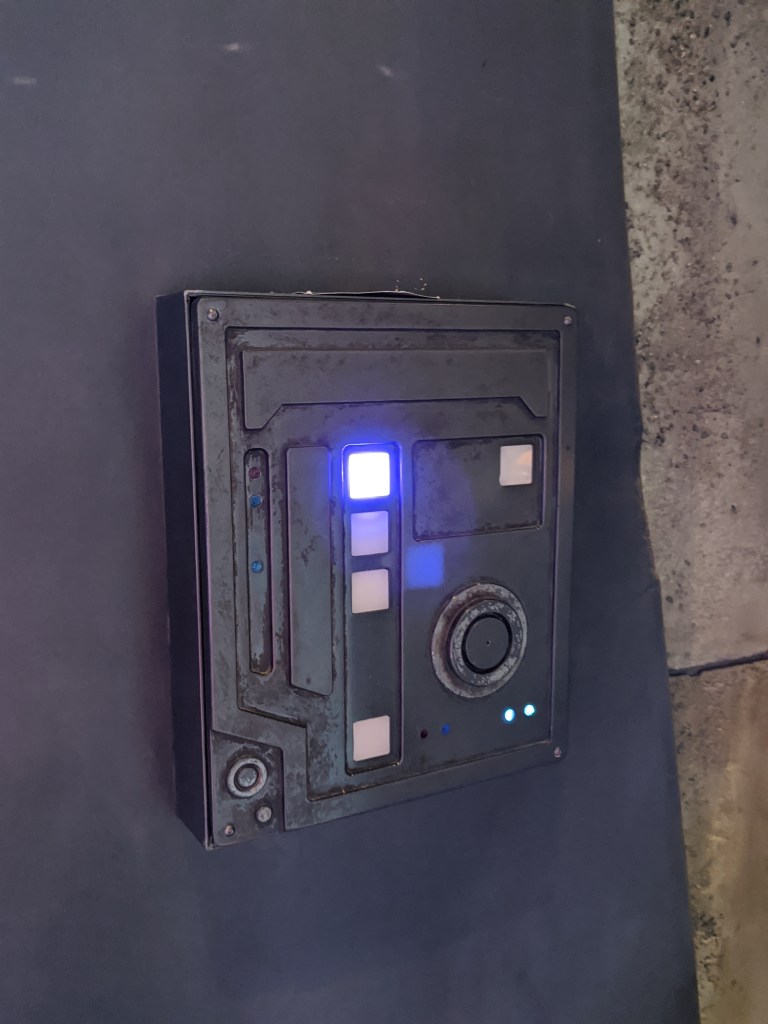
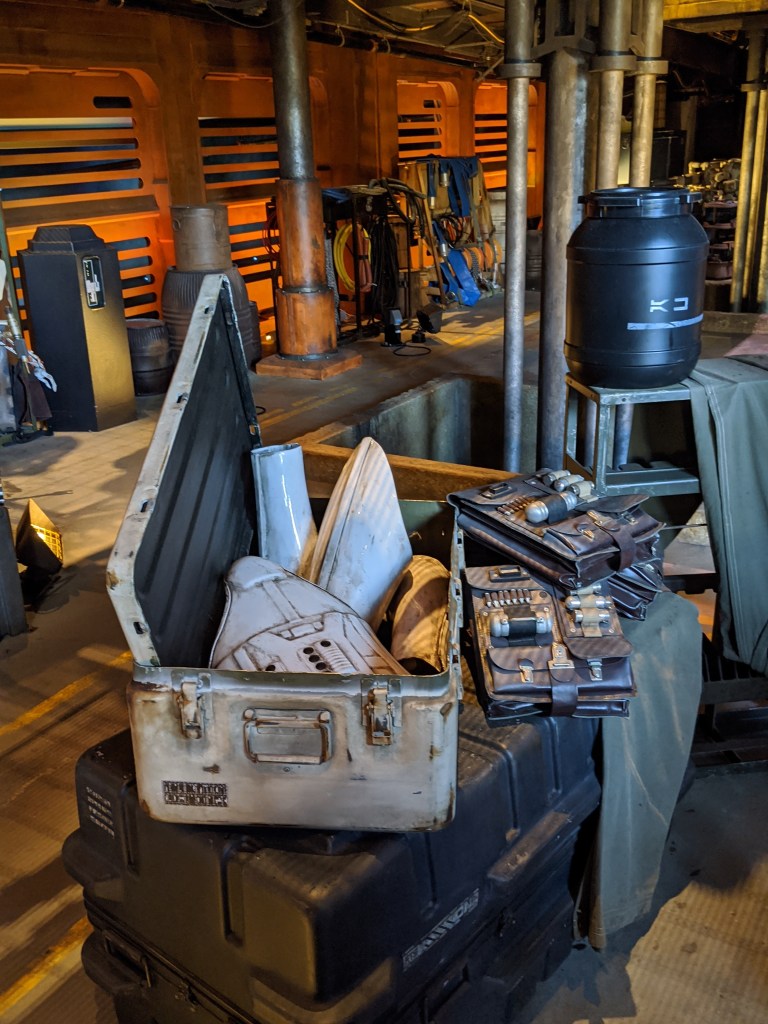
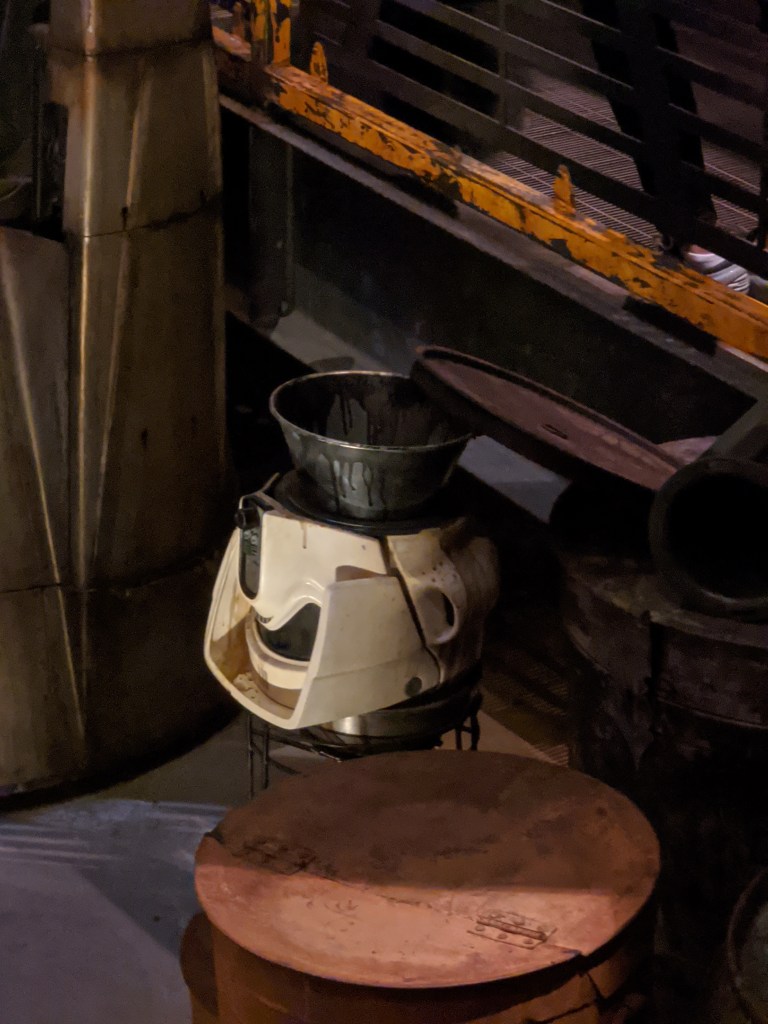
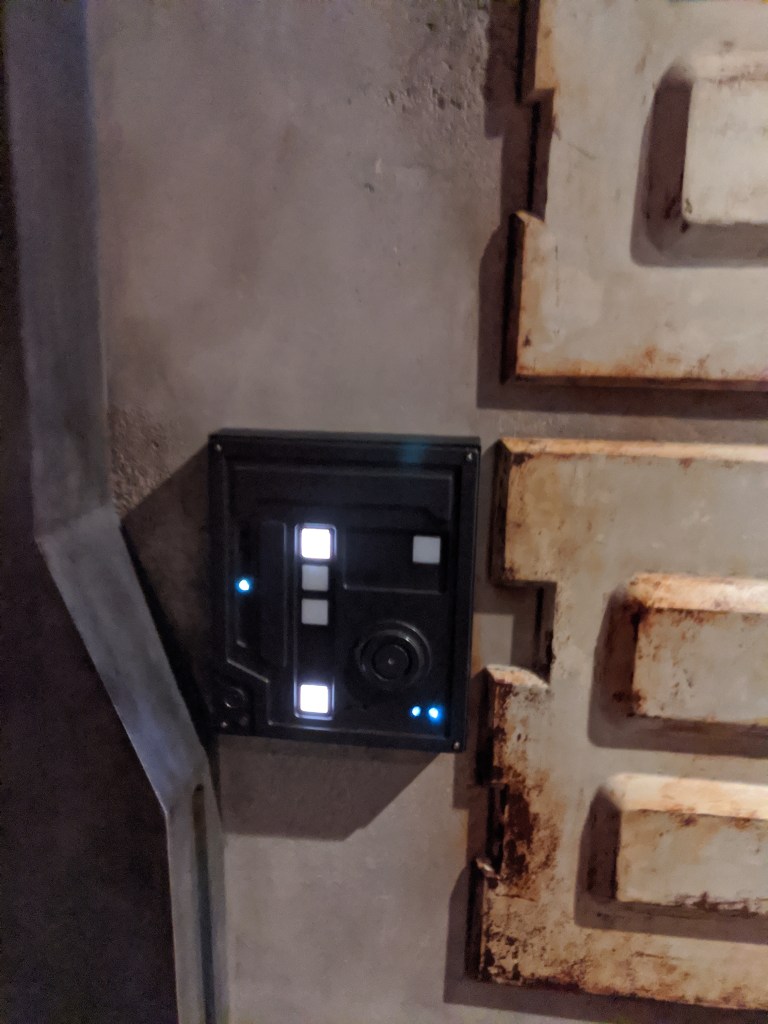
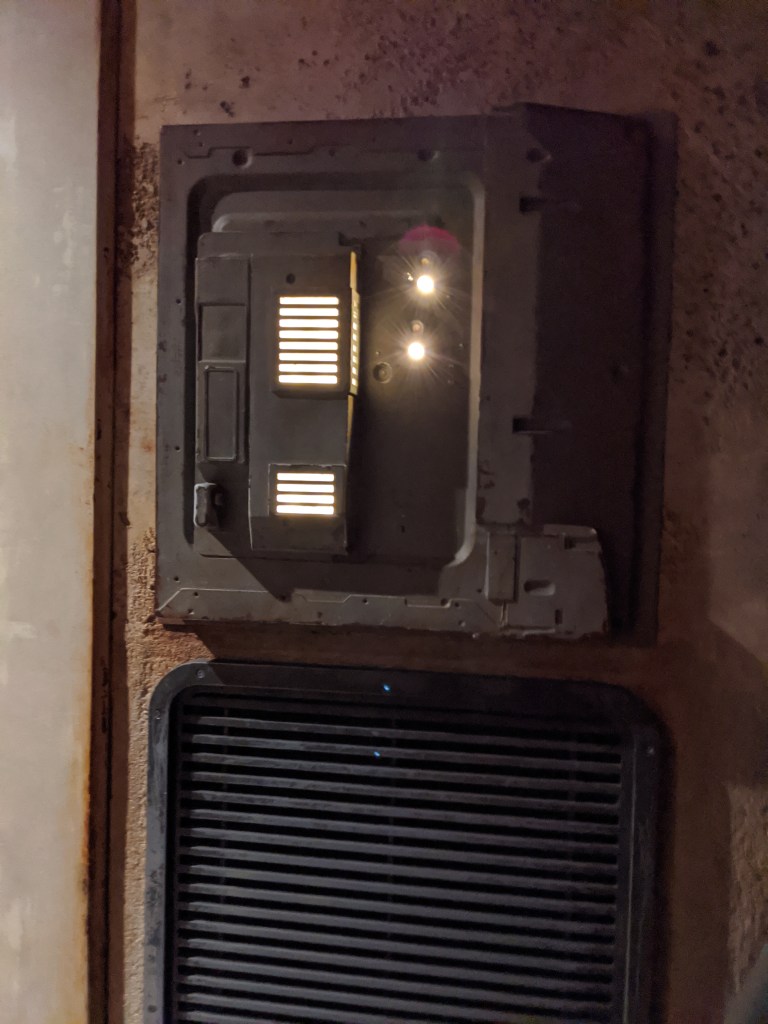
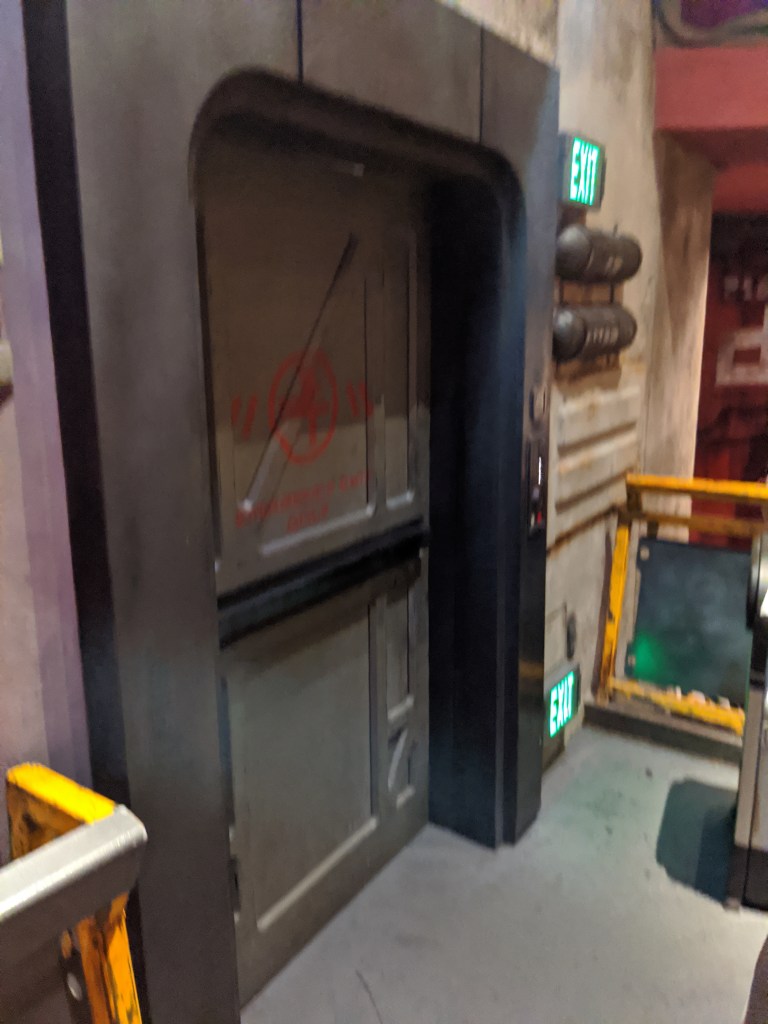
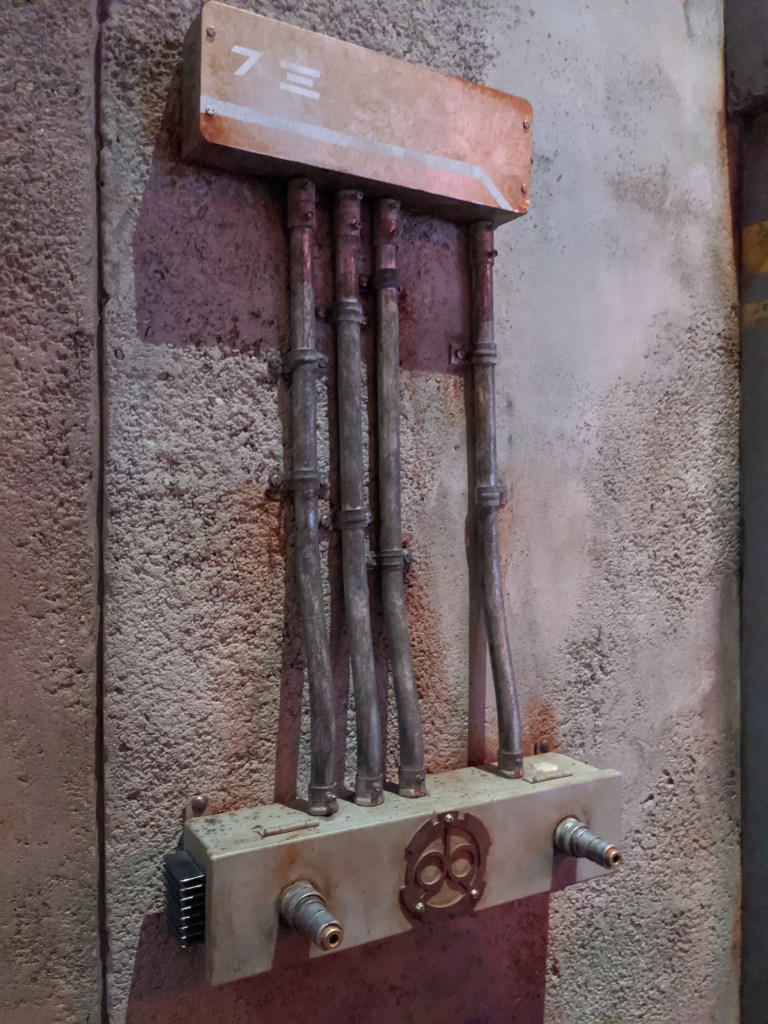
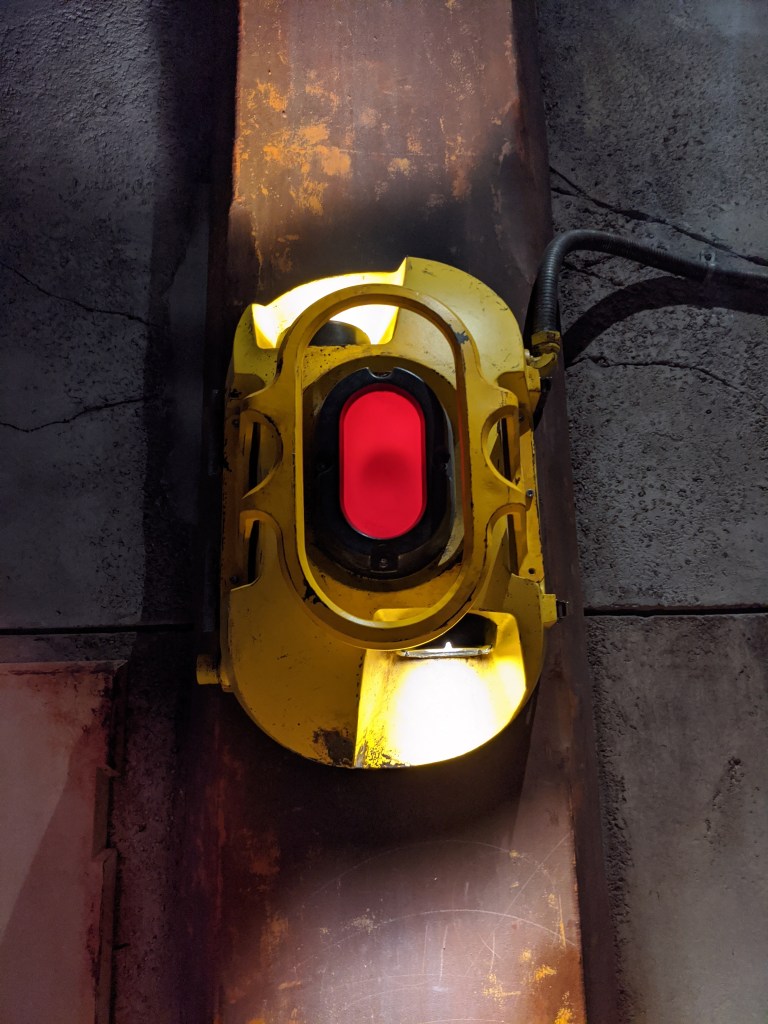
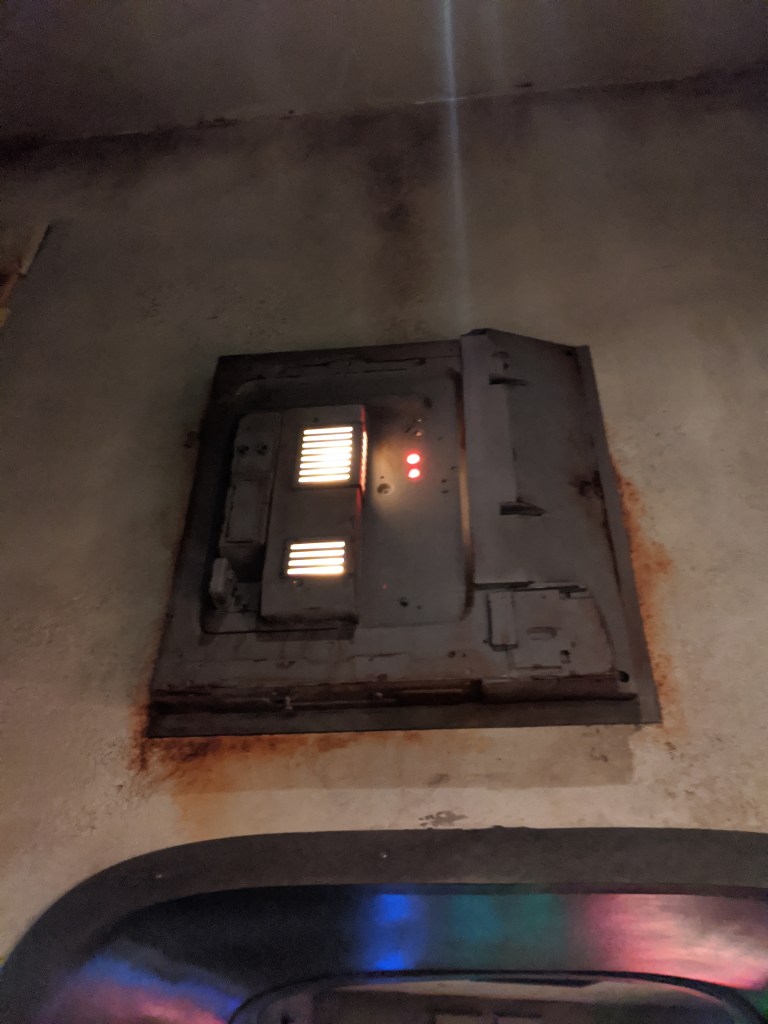
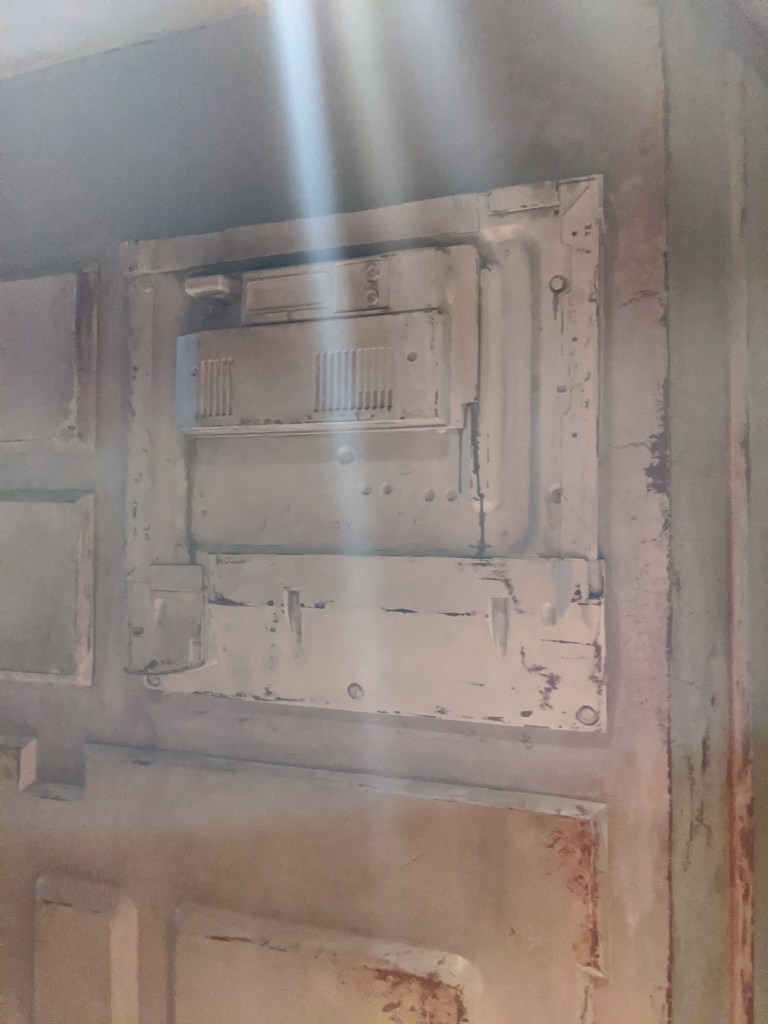
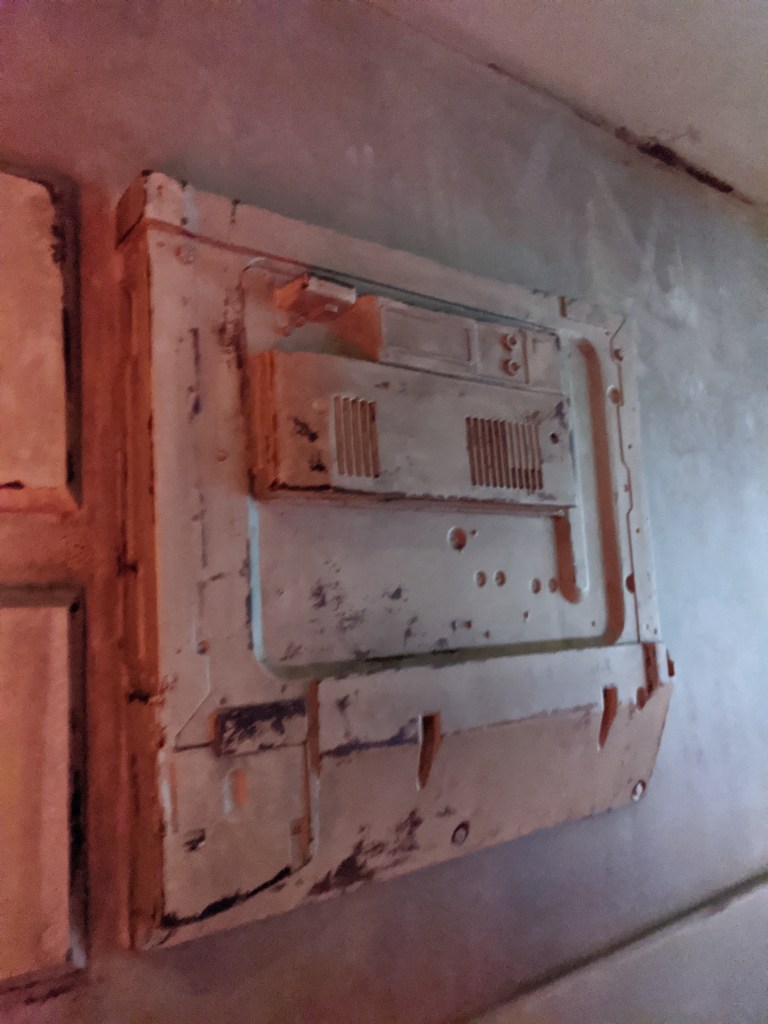
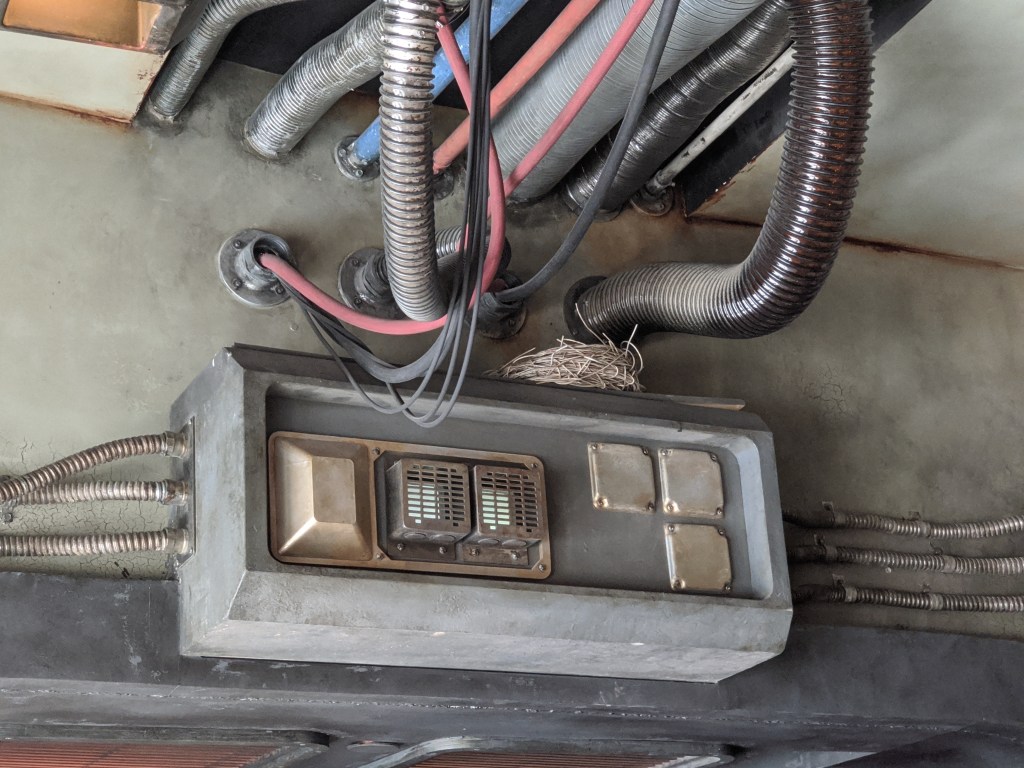
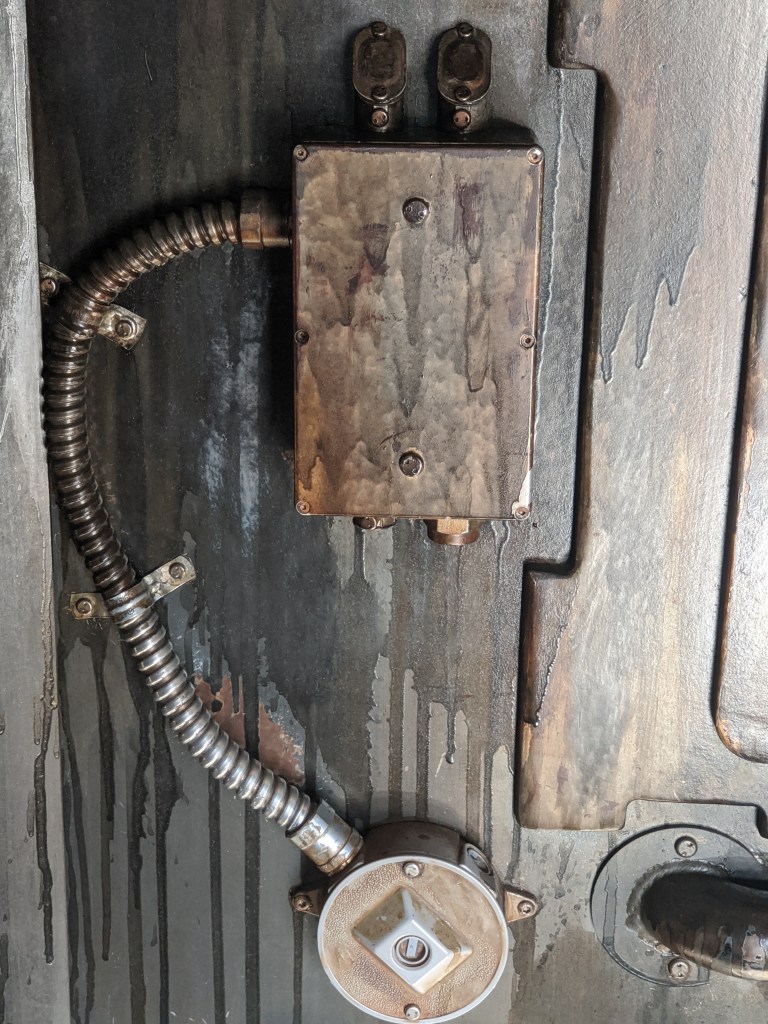
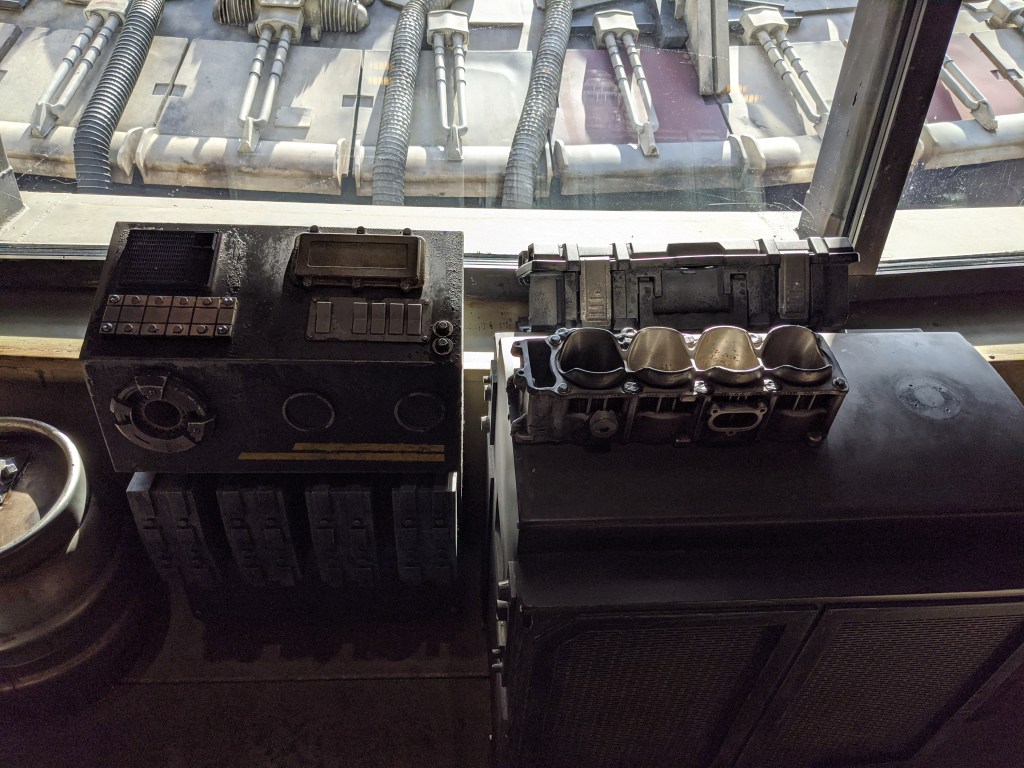
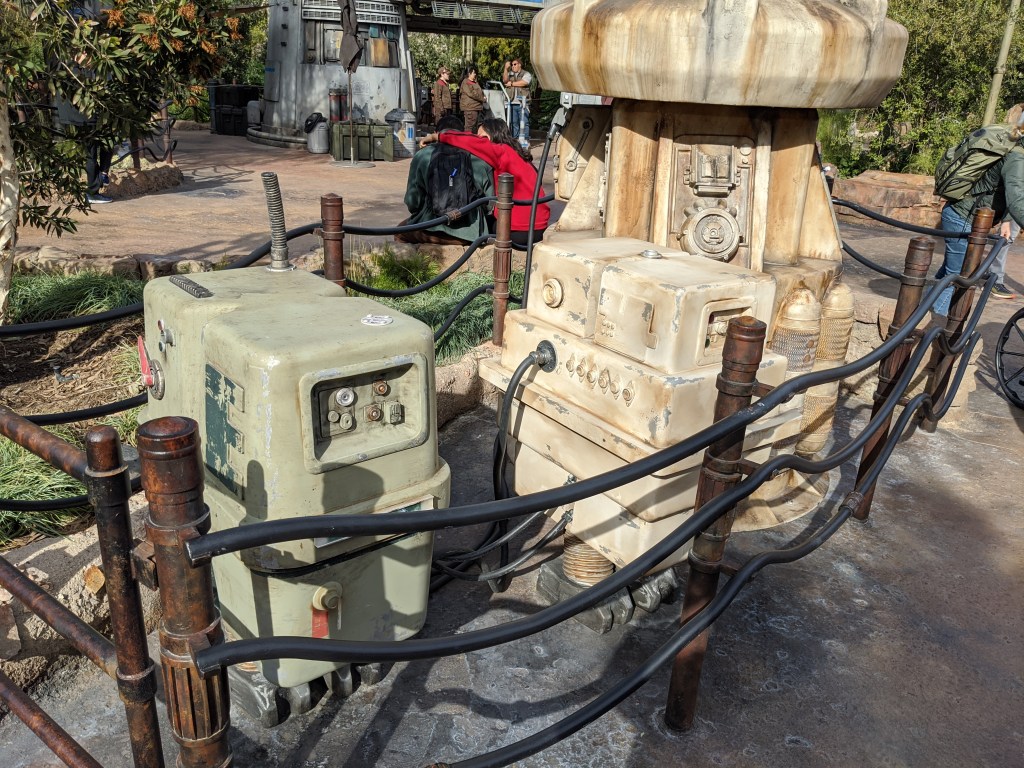
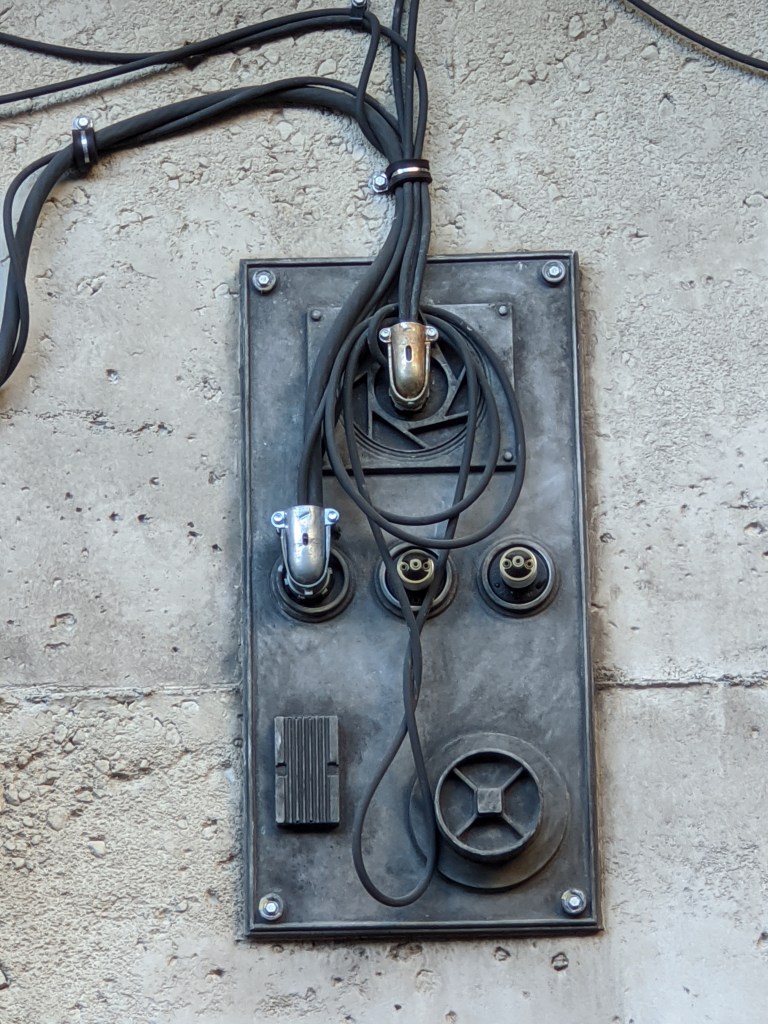
Here’s a bunch of photos I took last week at Star Wars Galaxy’s Edge – Black Spire Outpost in Disneyland. I thought they may be useful for anyone trying to build a similar thematic structure, either for dressing up a home theater room, or just to add some spice to a family room.
-

Home Hacker Project: Battery Powered Water Fountain
Howdy! Welcome to the first weekly electronics tutorial — I’m going to be aiming to do this out front of my house every Friday for students walking home from Donegal Intermediate School or folks visiting our Little Free Library to check out!
Parts for today’s build:
- Small Water Pump — from Amazon, $12.99 for 5
- 6 inch length of ¼ inch inner diameter tubing
- Some variety of power supply — I’m using a rechargeable 18650 Lithium Ion battery as that’s what I’ve got lying around, but you could just as easily use 3 AA batteries in a holder like this one from Amazon that costs $7.99 for 4
- Hot glue gun
- A small container you’ve pulled from your recycling bin
- Water (food dye optional for fun coloring)
- A plastic baggie (to hold your batteries and wires to keep them nice and dry)
First thing we’re going to do is to take our container that will become our fountain, and punch a small hole in the side of it, just above the bottom. This will be what we’re going to feed our wires from the pump out of, so that the pump can be submerged!
Next, we’re going to attach the small length of tubing to the pump (this is what’s going to squirt water up in the air), and use our hot glue gun to attach the base of the pump to the inside base of our container. Thread the wires through the hole we made in the container (or just let them drape over the side if you’d rather), and attach them to the wires from our power supply. No switches today!
Add water, and see it pump! It’ll run for a while until your batteries die off, then you’ll need to recharge or replace them. In future projects, we’ll learn to integrate cheap solar panels into our projects so they can keep running indefinitely!
Curious how water pumps work? It’s kinda like a fan in your home! A motor spins a propeller that then gets forced out and up a hose!
Neat, huh?
-
So that I don’t lose it: Stifado Recipe
Ingredients:
- 2-3 lbs beef, cubed
- 2-3 lbs pearled onions
- 1 large yellow onion, chopped
- 1 28 oz can tomatoes
- 1 cup dry red wine
- ¼ cup red wine vinegar
- ⅓ cup olive oil
- 3 cloves garlic, bruised
- 1 tsp sugar
- Spice bag:
- 2 bay leaves
- 1 tablespoon allspice berries
- 2 3-inch cinnamon sticks
- In a stew pot / dutch oven, over medium-low heat, add the chopped onion, half the olive oil, and ¼ cup water. Cook until the wayer has evaporated and the onion is soft and translucent, about 10 minutes.
- To the onions, add the garlic and tomatoes. Cook, stirring, until the sauce is thick, about 20 minutes.
- Rinse the beef, drain, pat dry. Season lightly with salt and pepper. Heat the remaining olive oil in a skillet until hot. Brown the beef over high heat, add to the tomato sauce.
- Add the red wine to the skillet to deglaze, and bring to a boil while scraping up any fond from the bottom of the pan. Add the pearled onions and sugar, and cook over medium-high heat, stirring, until the wine is reduced to a glaze and the onions are lightly browned, about 5 minutes.
- Add 3 tablespoons of the red wine vinegar to the onions, and bring to a boil.
- Add the spice bag and the onions and wine sauce to the beef and tomato sauce mixture.
- Cover and cook over low heat for 2-2½ hours.
-
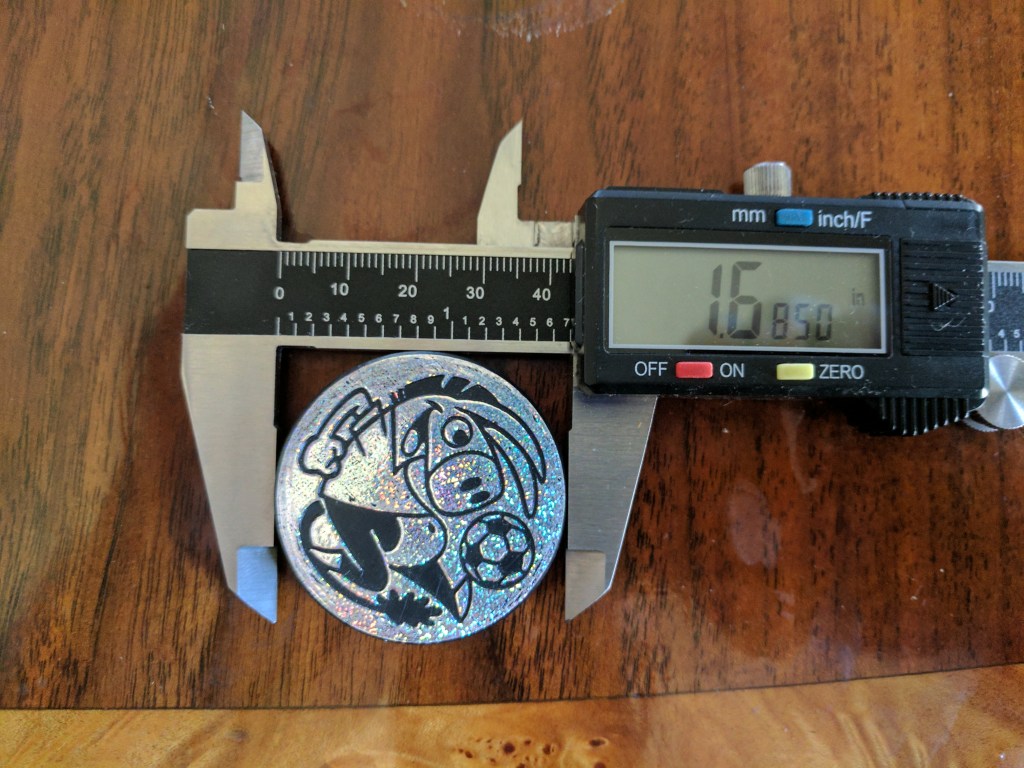
The Dimensions of POGs
Because of reasons, I’ve had cause to dig out my old POG collection and take detailed measurements of them. Here’s what I’ve come up with:
A POG Milkcap measures:
- 41.37 mm or 1.6285 inches in diameter.
- 1.25 mm or 0.0490 inches in thickness.
- Forty POGs weigh 1.65 oz or ~0.041 oz per POG.
- Forty POG measure 2.0310 inches in thickness
An off-brand Slammer is:
- 42.80 mm or 1.6850 inches in diameter.
- 5.91 mm or 0.235 inches in thickness.
- 0.30 oz.
So, a Slammer is approximately 4-5 POGs in thickness, about 1.5mm larger in diameter, and weighs approximately 7-8 times as much as an individual POG.


-
Hacker Home Security Hardware Prototype!
Just wrote a post over on Hacker Home Security detailing the first prototype board for my project of the same name.
I’d expected initially to make it on the D1 Mini platform, but recently sorted out some of my prior problems with using a raw ESP8266, so I’ve since migrated to that. Plus it’s significantly more power efficient as it doesn’t need to run a usb-to-serial adapter as well, which can be an unnecessary drain on the D1 Mini.
I really enjoy designing circuit boards. There’s a certain artistry to them, an efficiency of space that really constrains the options and results in some results that I really take pride in. Let me know what you think!

-

When Mike Pence Comes to Your Alma Mater
I’ll be writing a similar letter to my alma mater’s leadership shortly.
Very disappointed right now.
-
WordPress of Things
Continuing my prior remarks on building Internet of Things devices that connect to WordPress, I delivered a talk at WordCamp Lancaster earlier this month on that topic.
All the code from the examples is up on my GitHub page here:
https://github.com/georgestephanis/wordpress-of-things/
I’ll be working on some future posts that open each project up in more depth to explain how it comes together.
-
Motion Sensor WiFi Light Switch
The downside of the old knob and tube style of wiring is that some off-the-shelf light switches, like the common Leviton motion-sensor switch, are totally non-functional without a ground wire — which knob and tube wiring doesn’t typically provide.
What is a hacker to do?
The smarter solution is probably to find a way to run a ground wire through the walls of half hour house and up two floors to go from your junction box to the switch in question.
My solution? Build my own.
The simplest way to cobble together a motion detector light would be something like a PIR sensor attached to a power supply and a relay to safely control mains voltage, but that has no way to manually activate or deactivate the light.
To add a bit more granular control to the system, I decided to build it on top of an Arduino base, so I could add more controls. For space constraints (as well as the fact that I had a spare one lying about), I used a Wemos D1 Mini — easily programmed via the Arduino IDE, and if I ever want to expand its capabilities, I can easily connect it to my home wifi and attach it to Blynk.
As an added bonus, I has a D1 Mini Relay Shield lying about as well. This made one less thing I needed to wire up, and could just plug it in. Add in a momentary switch for human input, and our circuit looks something like this:

(Note, that is the relay shield stacked on top of the D1 Mini, they can be hard to differentiate in the mockup)
Bill of Materials:
- D1 Mini — $2.85
- D1 Mini Relay Shield — $1.36
- PIR Sensor — $0.78
- Momentary Switch — $1.76 (but I wound up using this $4.49 one from Home Depot)
- A little bit of wire.
After some tinkering, here is my code to get the system working:
This file contains hidden or bidirectional Unicode text that may be interpreted or compiled differently than what appears below. To review, open the file in an editor that reveals hidden Unicode characters.
Learn more about bidirectional Unicode characters
/** * PIR Closet Sensor, with kill switch. */ const int relayPin = D1; const int pirSensor = D2; const int btnSensor = D8; int pir = 0; // Variable for pir. int pirState = LOW; // Start as off. int btn = 0; // Variable for button. int btnState = LOW; // Start as off. void setup() { Serial.begin( 9600 ); Serial.println(); Serial.println( "Starting up…" ); pinMode( relayPin, OUTPUT ); pinMode( pirSensor, INPUT ); pinMode( btnSensor, INPUT ); } void loop() { btn = digitalRead( btnSensor ); pir = digitalRead( pirSensor ); // If a button is pushed, and motion is detected, // turn off the light and wait until it resets. if ( HIGH == btn && LOW == btnState && HIGH == pir ) { digitalWrite( relayPin, LOW ); btnState = HIGH; Serial.println( "Killswitch detected — turning off light." ); delay( 1000 ); return; } // If the button was pressed, keep shorting // until the pir goes low again. if ( HIGH == btnState ) { if ( LOW == pir ) { Serial.println( "No motion, resetting state." ); btnState = LOW; } if ( HIGH == btn ) { Serial.println( "Button pressed, turning light back on." ); digitalWrite( relayPin, HIGH ); btnState = LOW; } return; } // If the pir senses light, if ( HIGH == pir ) { digitalWrite( relayPin, HIGH ); if ( LOW == pirState ) { Serial.println( "Motion detected!" ); pirState = HIGH; } } else { digitalWrite( relayPin, LOW ); if ( HIGH == pirState ) { Serial.println( "Motion ended." ); pirState = LOW; } } } The code could probably be simplified by removing the logging messages, but I like to leave them there for further reference and debugging down the road.
So now that we’ve got the components gathered, it’s time to look at how we put it in! As luck would have it, the electrical box that the previous switch used was a double gang box, so I had a bit of room to work with. I picked up a solid 2-gang cover at my local Home Depot, and drilled two holes in it for the switch and the PIR sensor.
Now, all is right with the world, but we still have to actually power it! Through some creative wiring, we’ve thus far managed to avoid having to splice any wires together (by using both the 5v and 3v3 outs on the board for wiring to different peripherals, and only the PIR needed a ground wire) and to continue that trend, we’re going to be powering it through the D1 Mini’s USB port, and to power that USB port via a 6″ USB cable, connected to a genuine Apple iPhone power adapter — they’re tiny, and very well built transformers (just don’t mess around with cheap knockoffs, they’re terrifyingly dangerous — especially if it’s going to be mounted inside a wall!).
To connect the 120v AC to 5v DC transformer (the aforementioned power adapter) to mains power, my plan is to connect it to home wiring via two crimp terminals and some heat-shrink tubing around that as additional insulation to avoid any exposed metal, as there isn’t an outlet in the box to plug the adapter into.
Well, that’s the plan. As I said — far trickier than just running a ground wire across half my house, but hopefully more fun and I’ve learned a lot in the process. I’m expecting to hook it up in the next couple days, and will update here when it’s live and functioning!
-
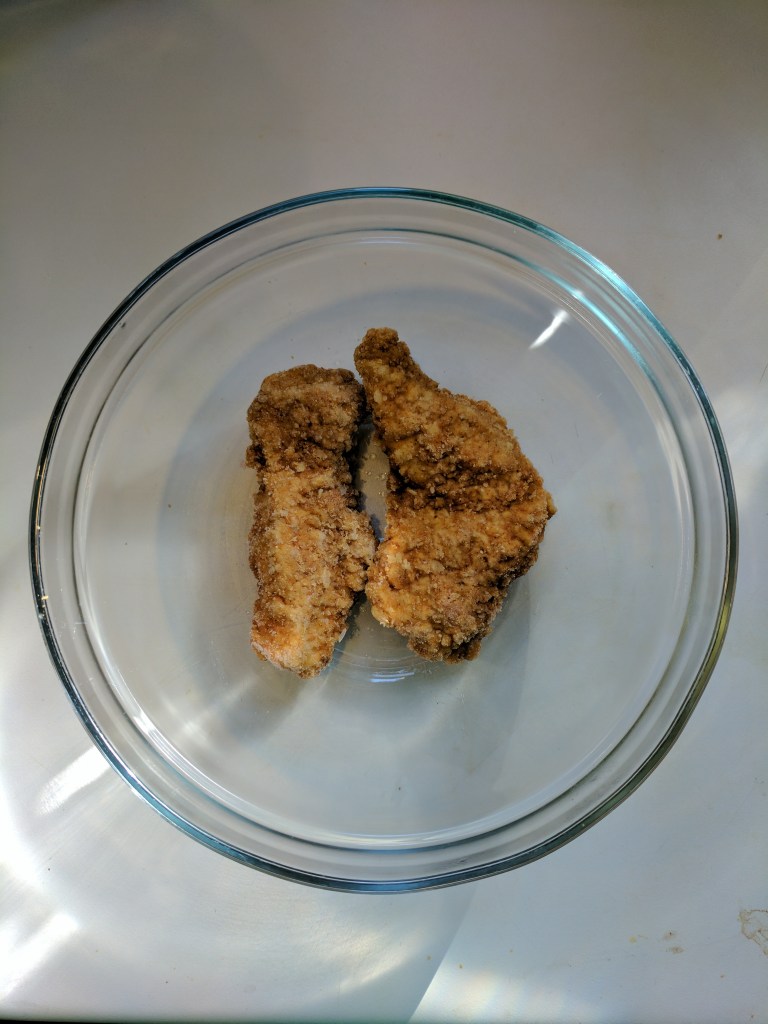
Chicken Tender Wrap
Chicken Tender Wrap

Food of the Gods
One of the best things about my college experience at Grove City was the one unique, delectable item on the menu that — to date — I’ve never seen quite duplicated elsewhere. So for any other Grovers out there that miss the taste of the Chicken Tender Wrap, here’s what I’ve come up with as a pretty darn close approximation.
Credit: Angela Starosta and Matt Schiavone for help piecing back together the recipe.
Ingredients
- 1 large burrito-size tortilla
- Diced plum tomatoes
- Chopped iceberg lettuce
- 2 Chicken Tenders
- Ranch dressing
- Hot sauce (optional)
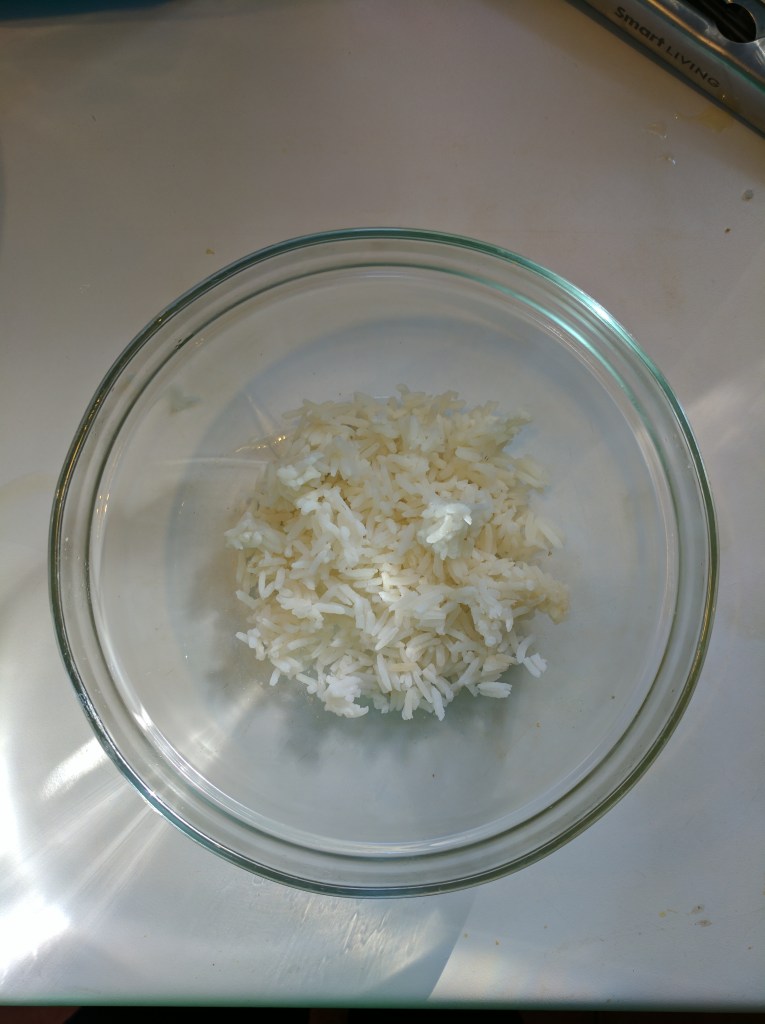
- White rice
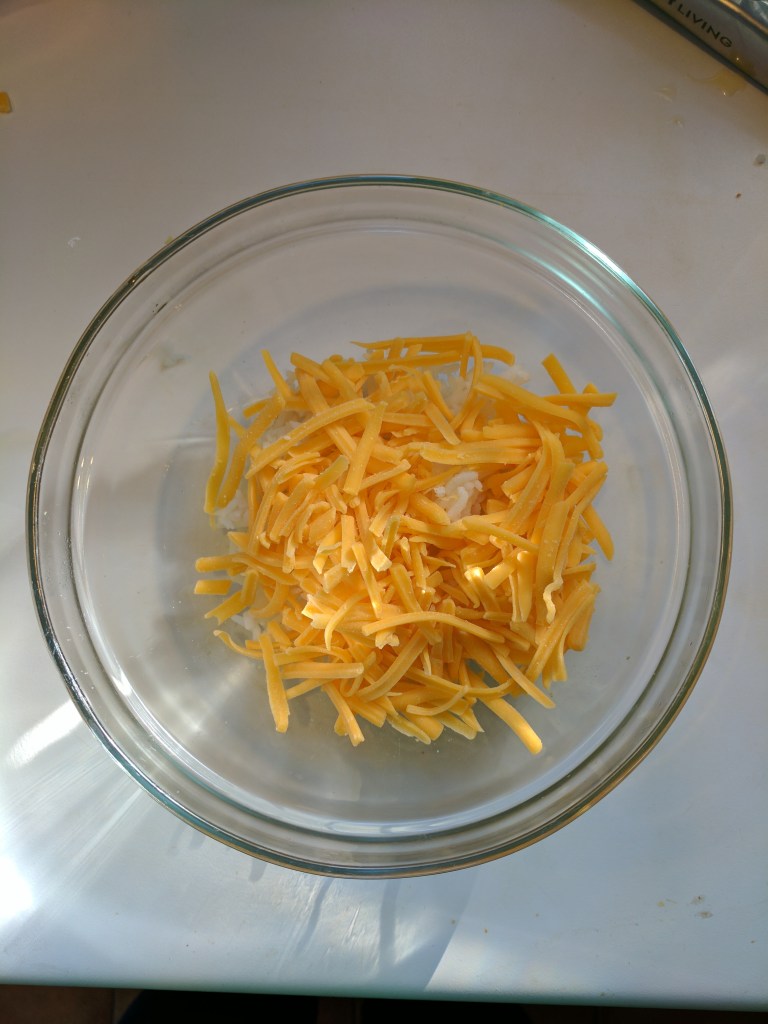
- Shredded mild cheddar cheese
Directions
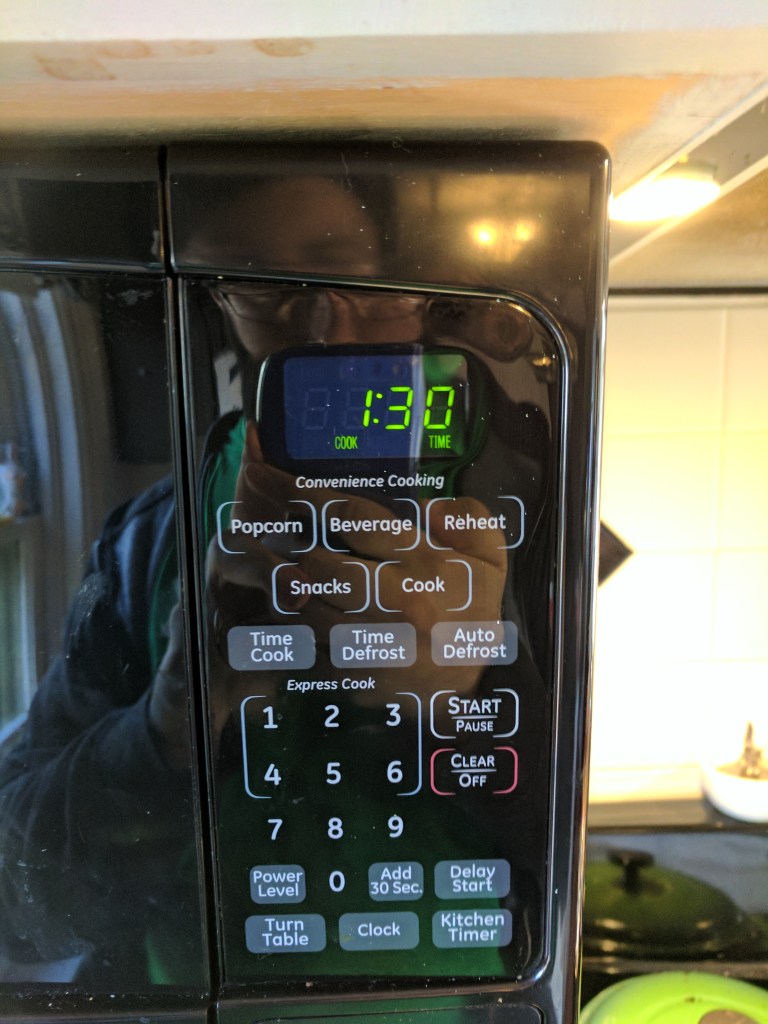
- Put two frozen chicken tenders in a microwave safe bowl, and microwave for 1m30.
- Put the tortilla wrap you’re using on a plate. Spread some diced tomatoes and chopped lettuce as a base.
- Take the (now hot) chicken out of the microwave, and put it in some hot oil in a skillet over medium heat for about 30-45 seconds per side.
- Take the chicken tenders out of the oil, put them on a cutting board, and chop them into maybe ½” chunks.
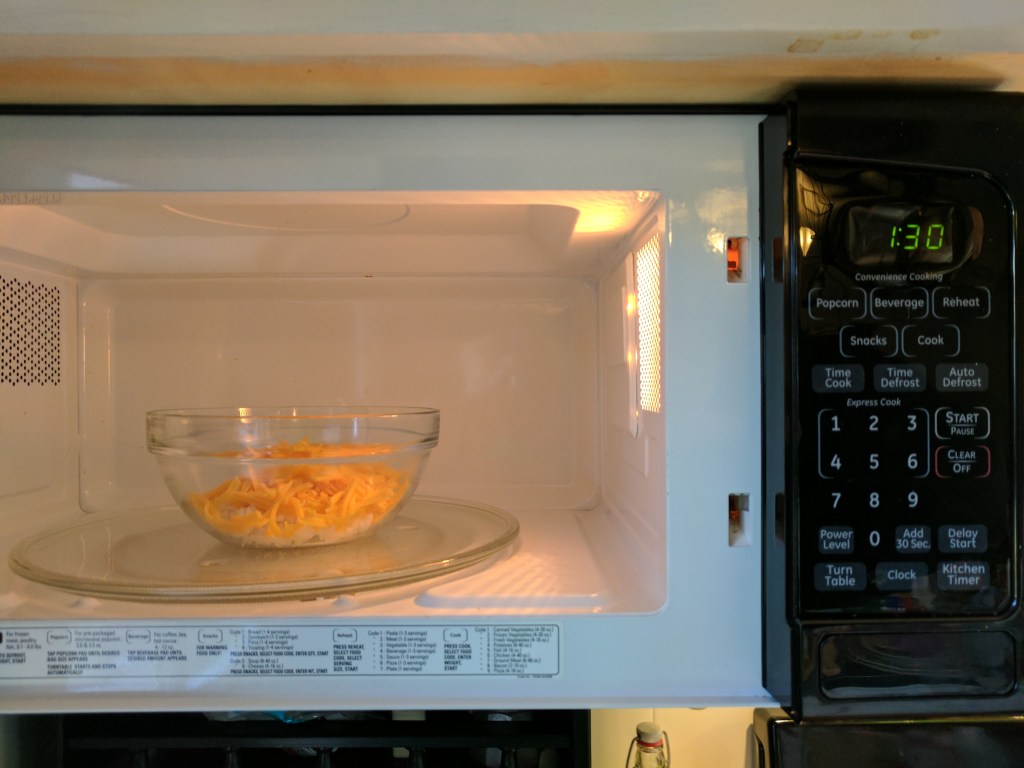
- In the same microwave safe bowl, put approximately equal quantities of white rice, and then shredded cheddar cheese in, and microwave for 1m30.
- Spread the chicken on top of the lettuce on the wrap. Add your desired quantities of ranch dressing and hot sauce.
- Take the melted cheese and rice out of the microwave and combine it with a spoon until it’s mixed. Add this on top of the chicken.
- Wrap, folding the edges, and slice it on a bias. Enjoy!
Disclaimer: You’ll want a bigger tortilla than I’m using in the pictures. I wound up having way too much stuff in it, and had to split it into two wraps after trying to wrap it.


-
Electronic Conference Badges
Ever since attending Defcon 24 this past August, I’ve been enthralled with the idea of electronic event badges.
I’m also pondering and trying to sort out what exactly would be needed to accomplish them on a budget that could be done for a WordCamp, and have it be both hackable after the event, but also usable during — and of course, look cool.
From my experience running a WordCamp, I know that attendee gifts should normally be about or just under $10 per attendee, whereas speaker gifts should normally be about maybe $20 or so. One handy bit is that speaker gifts are in addition to attendee gifts that they get anyways, so it’s possible to have the speaker gift be an addition to their attendee badge — like an LED display and better battery or sensors or the like.
All this compiles to roughly the following requirements for attendees:
- $10 per badge price limit.
- Battery powered.
- Blinky LEDs — either pretty or useful.
- (optional) Reprogrammable after (or during) the event.
The programmability and interactivity aspect of the badge is particularly tricky, but there’s a variety of cheap microcontroller units (MCU) like the ESP-8266 12-F that can be had for under $1 per in quantity. Or, if you’d like something a bit easier for your attendees to reprogram, the Wemos D1 Mini which is based on the aforementioned ESP-8266 12-F can also be had for under a dollar in quantity — while it would make your badge a bit bulkier as it would need to connect to your badge via pins, rather than just soldering SMD directly to the badge — it also provides a Micro USB port to make it easier for users to connect to, without having to supply their own UART adapter. The added bulk is likely worth it, in this case.
As an aside, the Wemos D1 Mini is also programmable via the Arduino IDE, so that may simplify the process for your attendees to hack on their badges.
The other tremendous advantage to using an ESP8266 based board as the brain of your badge is that the ESP8266 is actually a wifi chip! That’s right, it can reach out and connect to wifi networks, or make an ad hoc network between multiple badges so they can communicate!
This opens up a number of possibilities. Would you like to let your attendees sign up for specific sessions throughout the day, and have their badge light up an LED indicating which room they need to go to? Totally doable! Would you like to have every attendee’s badge light up and start blinking at the same time? Also doable!
The one downside with being cost-constrained is that you may wind up putting in more time than expected assembling the boards. It is possible to have your factory that manufactures the PCBs also pick and solder all the components, but that costs a bit more as well. If you’re doing a short run of maybe 10-20 boards for just speakers or the like, it’ll probably be easier to just make them yourself.
—
The other option that can be explored is to have the attendee gift be a cheap system-on-a-chip linux computer somewhat like to the $5 Raspberry Pi Zero — basically giving every attendee a computer that can operate as a WordPress Server — and then have the Speaker Gift be a badge with sensors and lights and batteries that can be powered by the attendee gift.
In my exploring of this option, it seems that the simplest option may actually be the C.H.I.P. — while there are other options such as the aforementioned Raspberry Pi Zero and Orange Pi Zero, they both would necessitate also picking up MicroSD cards which can add to the price significantly — however, there are other development boards like the C.H.I.P. that include sufficient storage space on-board to simplify supply chain management.
https://nextthing.co/pages/chip
For $9, you get a 1GHz processor, 4GB of storage space, 512MB of RAM, and both Bluetooth 4.0 and WiFi b/g/n for connectivity. While it doesn’t have the mini-HDMI out that the Raspberry Pi Zero has, it does have composite video out on the board’s headphone jack — and the manufacturer also sells expansion boards that can add on either HDMI or VGA displays.
As an added bonus, when you need to flash your Chip, the maker also has a tremendously simple, browser-based flasher tool. For something you’re giving to attendees — many of whom may not be comfortable with flashing development boards — the visual flow can be tremendously useful as a jumping off point for many.
Then you simply need to design a badge with the pin headers for the C.H.I.P. to plug into, work up a firmware image with things such as the event’s wifi details preloaded, and a script running on a cronjob to operate the lights — and you’ve got yourself a badge for your speakers!
Or at least that’s the plan. At the moment, this is all theoretical, I’ve been puttering about and planning possibilities, but haven’t had occasion to actually put all of this into practice. If any of it catches your fancy and you’d be interested in doing digital badges for your WordCamp, drop me a line on Twitter at @daljo628 and I’d be happy to help as I can. 🙂